git을 혼자만 쓰다보니 쓰는 기능이 한정되어 있고, 직전 실무는 SVN을 썼고 브랜치 전략이란게... 없었다.
아주 오래전 git flow 를 경험해본적이 있지만 잘 기억이 나지 않아 한번 정리해보았다.
git master branch의 default name
master vs main
예전에는 master로 default name이 사용됨
요즘에는 main이 default name으로 생성됨
origin : remote repository url을 참조하기 위한 alias같은 것.
remote: origin이 참조하는 remote repository에 특정 커맨드를 수행하기 위해 사용하는 커맨드

pull과 fetch의 차이
pull: remote repository의 내용을 가져와 자동 병합 (fetch + merge)
fetch: remote repository의 내용을 확인하고 로컬 데이터와 병합은 하고 싶지 않은 경우 사용
fetch를 실행하면 최신 커밋 이력을 이름없는 브랜치로 로컬에 가져옴
FETCH_HEAD로 체크아웃 가능
git flow 기본 개념
main: backbone과 같은 중심기점 브랜치, 운영 소스
stage:
develop: 개발 서버에 배포되는 브랜치
relase(임시)
feature(임시): 이슈 브랜치, 기능 별 브랜치
hotfix(임시): 배포된 소스코드에 버그가 발견되면 생성하여 관리하는 브랜치
git 연습
main, develop 브랜치로 이것 저것 연습해볼까 한다.
1. main, develop repository 생성
1-1. main 브랜치 생성
일단 기본적으로 repository를 생성하고 git clone을 하면 main 브랜치가 생성됨


1-2. develop 브랜치 만들기

아직 로컬에만 만들어진 상태이다.
리모트에 올려보자.

1-3. main에 직접 소스를 push 할 수 없도록 브랜치 설정을 github에서 해보자.
github > settings > branch
pull request를 통해서 merge 하도록 설정
직접 push못하게 막음


2. feature 브랜치 생성해서 작업하고 develop에 merge, main에 pull request까지
feature브랜치는 기본적으로 develop브랜치에서 딴다고 함. (프로젝트 별로 다를 수 있음)
나는 main에서 따봤는데, 일반적으로 hotfix가 이런식으로 진행됨

2-1. feature 브랜치 만들어서 작업후 커밋, 푸쉬
2-2. develop에 feature 변경점 merge하기

2-3. main에 pull request하기
github > pull request

3. cherry pick 써보기
특정 commit만 찝어서 현재 Head가 가리키는 branch에 추가하는 방법
3-1. feature 브랜치에서 commit 두 번 수행
commit1) commit1파일 생성
commit2) commit2파일 생성
3-2. git develop으로 체크아웃 후, 체리픽으로 feature 브랜치에서 수행한 커밋중
마지막 커밋내용(커밋 hash) 을 추가해보기

4. rebase
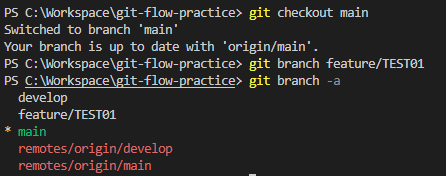
4-1. main 에서 feature3 브랜치 생성
git checkout main
git branch feature3
4-2. main 작업
C1, C2
PS C:\Workspace\git-flow-practice> git add .
PS C:\Workspace\git-flow-practice> git commit -m 'C1'
[main 5469492] C1
1 file changed, 1 insertion(+), 3 deletions(-)
PS C:\Workspace\git-flow-practice> git add .
PS C:\Workspace\git-flow-practice> git commit -m 'C2'
[main 84be1d5] C2
1 file changed, 2 insertions(+)
PS C:\Workspace\git-flow-practice> git push origin main
4-3. feature 작업
PS C:\Workspace\git-flow-practice> git add .
PS C:\Workspace\git-flow-practice> git commit -m 'C3'
[feature3 708e983] C3
1 file changed, 0 insertions(+), 0 deletions(-)
create mode 100644 feature.js
PS C:\Workspace\git-flow-practice> git add .
PS C:\Workspace\git-flow-practice> git commit -m 'C4'
[feature3 a8a5014] C4
1 file changed, 3 insertions(+)
PS C:\Workspace\git-flow-practice> git add .
PS C:\Workspace\git-flow-practice> git commit -m 'C5'
PS C:\Workspace\git-flow-practice> git push origin feature3
4-4. rebase main & squash commit
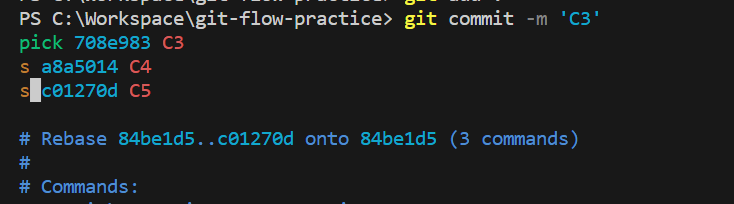
:wq
commit 메시지 수정


4-5. git push
이미 push된 상태라면 --force
그냥 push하면 아래와 같은 에러
리모트의 변경사항과 호환되지 않아서인듯

force push후 git graph

4-6. 충돌 났을 때는?
충돌 파일 해결 후
git add .
git rebase --continue
continue 하면 해당 commit의 message 수정할 수 있는데
초반에 여러 커밋을 squash 한다고 설정했다면 그냥 넘어가면됨
마지막에 전체 커밋 메시지 수정하는 페이지에서 수정하면 됨
'💻IT' 카테고리의 다른 글
| [HTTP완벽가이드] 캐시 (1) | 2023.10.16 |
|---|---|
| [HTTP 완벽가이드] TCP 커넥션 관리 (4) | 2023.08.31 |
| [Kotiln] No default constructor for entity (0) | 2023.03.27 |
| [클라우드 네이티브] 클라우드 네이티브 기술이란? (0) | 2022.04.07 |
| [jqxGrid] cellsrenderer not working (callback function not called) (0) | 2022.01.27 |